Life is too short for manual deploy
11 May 2022

I am releasing a book about the React Native ecosystem, which covers everything I wish I had known before I started working with this technology.
If you appreciate my work and would like to show your support, please check the Road to React Native.
In his guide "how to become a hacker", Eric Steven Raymond said: “No problem should ever have to be solved twice”.
Since I left university, I am following this advice every day to become an efficient developer.
One of the most important things —when you are building a mobile application— is your velocity.
Building a mobile app is different than developing a website. You need to be able to test your app quickly on real devices (mainly iOS and Android).
Today I am going to show you how to automate the deploy of your React Native application built with Expo.
Requirements:
- Expo account
- GitHub account
The manual way
If you have a look at the documentation, the workflow to deploy your code is something like this:
expo login expo publishThis simple workflow is working but we have some problems.
⛔ We have only one environment
⛔ It's not automated
Introducing release channels
If you want multiple environments for your application you can use the release channels.
If you want to deploy a new version of your application. From your develop branch you can use
expo publish --release-channel stagingFrom master you can use a production environment
expo publish --release-channel productionWith this setup, we made some progress.
✅ We have a production and a testing environment
⛔ It's not automated
Automation with GitHub Actions
With Github actions, you can automate all your software workflows, with world-class CI/CD.
Expo released an official CLI tool for GitHub Actions.
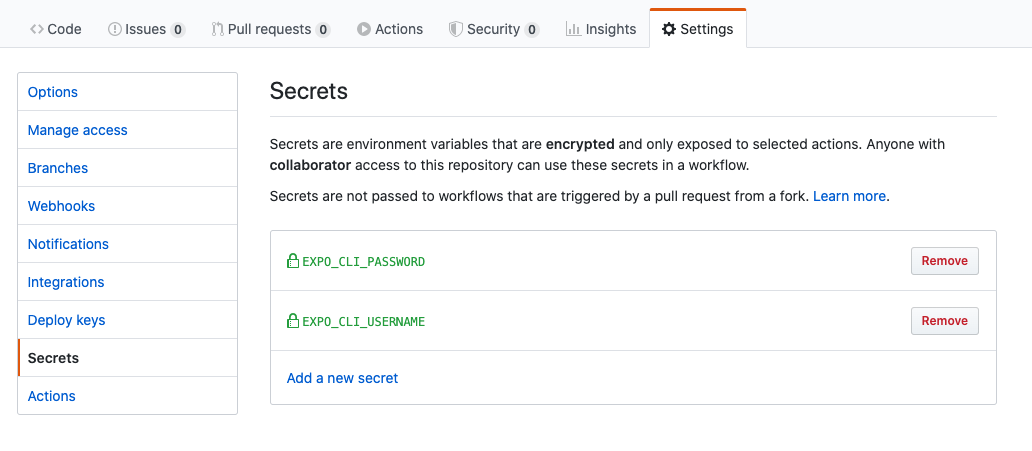
To make it work you need to add theses 2 variables on repository > settings > secrets
- EXPO_CLI_USERNAME and EXPO_CLI_PASSWORD
Create 2 files staging.yml and production.yml
// .github/workflows/staging.yml

name: Expo Publish on Staging
on:
  push:
    branches:
      - develop
jobs:
  publish:
    name: Install and publish
    runs-on: ubuntu-latest
    steps:
      - uses: actions/checkout@v1
      - uses: actions/setup-node@v1
        with:
          node-version: 12.x
      - uses: expo/expo-github-action@v5
        with:
          expo-version: 3.x
          expo-username: ${{ secrets.EXPO_CLI_USERNAME }}
          expo-password: ${{ secrets.EXPO_CLI_PASSWORD }}
          expo-cache: true
      - run: yarn
      - run: expo publish --release-channel staging
// .github/workflows/production.yml
name: Expo Publish on Production
on:
push:
branches:
- master
jobs:
publish:
name: Install and publish
runs-on: ubuntu-latest
steps:
- uses: actions/checkout@v1
- uses: actions/setup-node@v1
with:
node-version: 12.x
- uses: expo/expo-github-action@v5
with:
expo-version: 3.x
expo-username: ${{ secrets.EXPO_CLI_USERNAME }}
expo-password: ${{ secrets.EXPO_CLI_PASSWORD }}
expo-cache: true
- run: yarn
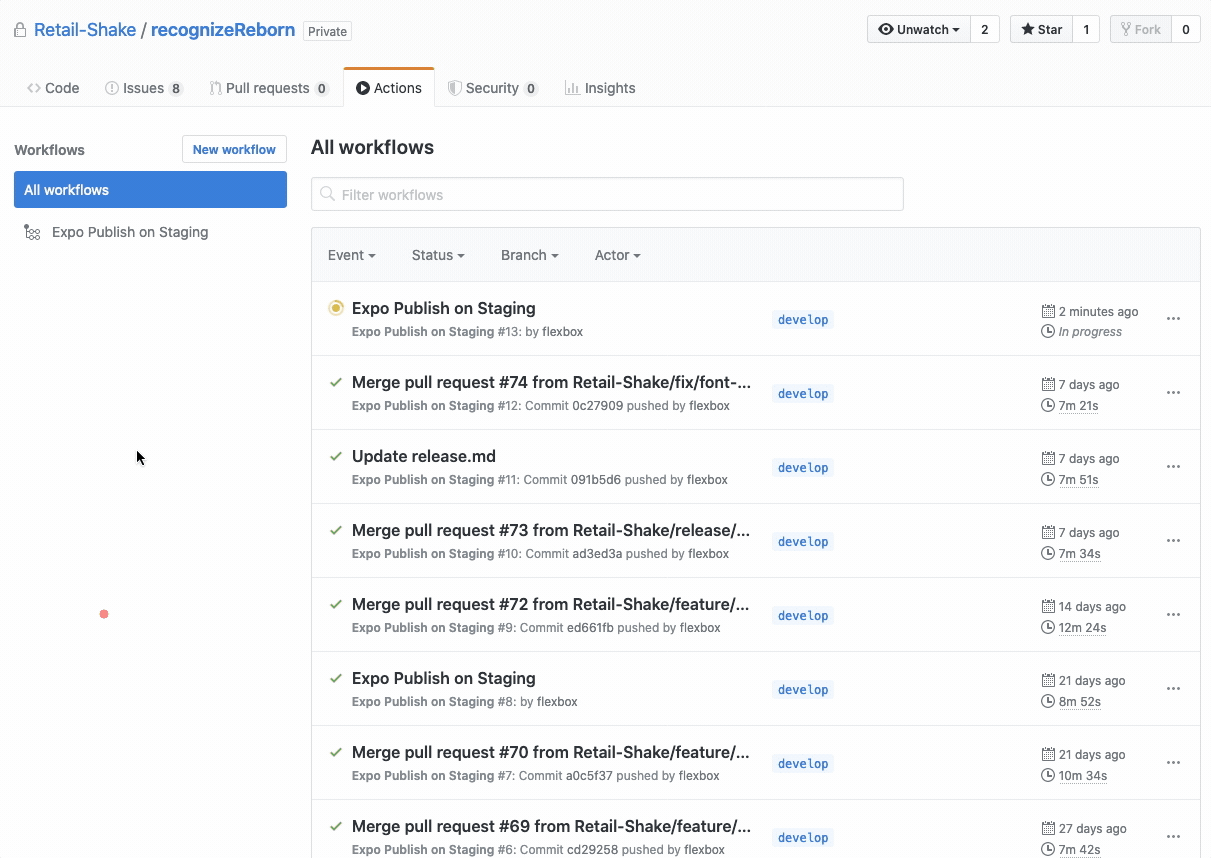
- run: expo publish --release-channel productionHere is a screenshot of....
...GitHub action in action! 🚀
Et voila!
✅ We have a production and a testing environment
✅ Everything is automated!
When you merge on develop you can quickly test your application on real devices without using the expo app.
When you merge on master you deploy your application on production.

Hi, I’m David, a french freelance developer working remotely. I’m the author of this blog, nice to meet you!
Subscribe?
Be the first to receive insightful articles and actionable resources that help you to elevate your skills.